Sunday, September 26, 2010

Highlights of the Dilworth Home Tour

Yesterday turned out to be a beautiful day for the Dilworth Home Tour!  Susan and I made a day out of it, stopping about halfway through for some guacomole and tacos at Cantina... mmmm.  Anyway, they wouldn't allow cameras, but I still snuck in a few pictures to share, shhhhh.  :)

This was a cute 3/1 on Tremont Ave with a classic bungalow layout...


I loved the mantle and built-ins around the fireplace...


This stunning front porch on Park Rd has been featured in Southern Living magazine...


And the kitchen was beautiful as well with cabinets all the way up to the ceiling and a libray ladder to help you get to them...


Then to make it even better, they added a huge skylight...


Plus, this breakfast nook with original built-ins and tons of charm...


Our favorite house had to be this one on Dilworth Road East...


Unfortunately, I got in trouble for taking pictures here, so I only got this one of the dining room.  But you can tell why I like it - the wainscotting, chandelier, and hydrangeas at each place settting... so pretty!


Oh, and I also snuck a picture of this great patio on our way out...


And finally, this house is one that I've always thought was so pretty from the outside...


But you wouldn't believe how crazy this place was on the inside - Horse hair fabric lining the walls of the entry way with bright pink dog statues welcoming you in.  The entire place was very eclectic with bright colors and super modern decor.  I did really like the master bath though, it was one of the only rooms with a pretty neutral decor, but still tons of pattern with the wallpaper on walls and ceiling...


And the backyard had an amazing courtyard with firepit and pergola...


Ok, I hope you enjoyed! 

By the way, if you are like me and can't get enough of looking at houses, the Elizabeth Home Tour is coming up next weekend.  Also, Homearama is going on in Cornelius now through Oct 10th.  I love this time of year!


Wednesday, September 15, 2010

Trim & Ceiling Design Revealed


The trimwork has been installed!  I am soooo happy with the way it turned out, it's amazing what a difference it has made.  It still needs to be painted, but you can really start to see the vision coming together now.  The picture above is the ceiling in the dinng room where the chandelier will eventually hang.  The ceiling is one of my favorite parts of this renovation because of how much character it adds to the space.  And it all started because of the ugly attic pull-down....


This pull-down was in the old hallway, but since the wall was knocked down, it is now in the larger dining room area.  So, after a lot of brainstorming, Matt and I came up with the idea to hide it by adding a pattern of trim on the ceiling.  I wanted to keep it pretty traditional, so we stuck with basic squares and went from there to make it fit the odd dimensions of the room and still cover up the ugly opening.  Here is what the attic pull-down looks like now...


Once it is all painted, you won't even notice that it's there! 

Here is another angle, see how it just blends right in???  Love it!


So, outside of the ceiling, the main trim work was around the opening.  These pictures came out a little blurry, but here is what it looks like.  You can see how it goes all the way from the opening to the ceiling like my first inspiration photo.


Here is a close-up...


The crown that wraps around the top is new as well, and it goes around the entire living room now.  We used to only have the original picture molding, but I decided we needed to add some more depth to the living room since so much was going on with the dining room.  The new crown molding is actually not the standard, it's called "cove" molding because of the shape. 

Also, see the unfinished piece of trim just below the cove molding?  That is new picture molding which we added to help maintain the original style of the house and tie it into the other rooms that still have the original picture molding.  We re-used some of the old picture molding by installing it in the one room that didn't have it, the hallway to the bed/bath area. 

Here is the look of the molding going around the room.  It's hard to tell from this picture, but once this is painted, it is going to be beautiful! 


Well, that's it for now...


Goodnight!

Monday, September 13, 2010

Decisions, Decisions, Decisions


Can you count the number of paint samples on this wall?!?  And this is just one wall, haha. I am definitely the Queen of Indecision lately.  This renovation has come with way more decisions than I ever would have thought, paint is just the obvious one.  I really wanted to do all white, but realized it's just not practical.  So, I decided a really light neutral would be a good compromise.  What's funny is that the very first color I put on the wall is going to end up being the one, except I'm going to lighten it by 50%.  It's Glidden Natural Wicker, which you can find in the top right color palette here.  Hopefully I won't change my mind before it's time to paint :)
 
EDIT: I actually DID change my mind, big surprise, right?  I ended up using Benjamin Moore Pale Oak and I absolutely love it!  It was a last minute decision, I literally was putting my hair dryer to the sample as the paint guys were showing up and waiting on my decision.  See how the color turned out in this post: http://charlottecottage.blogspot.com/2010_10_01_archive.html

Another decision I am trying to make right now is on the hardware for the built-ins.  You would think I could just find something at the local hardware store, but no such luck.  I tried to do that but just wasn't excited about anything I could find at the store and I wanted something slightly larger than the standard since the cabinets are pretty big.  So, I've been searching online on all kinds of websites from http://www.myknobs.com/ to http://www.houseofantiquehardware.com/.  Luckily I narrowed it down to oil-rubbed bronze for the finish, but it still has been very difficlut to find a set that would work for the drawers, doors, and the bookcase nook.  I want to find all 3 from the same manufacturer to make sure the color turned out pefectly matching.  Here are some of my favorites...  There are so many more, but I think you get the picture!


Now, what am I to do with the two wall sconces that are hardwired on either side of the mantle.  They are currently some cheap-looking ones that we spray painted silver a long time ago.  I really want to replace them with something nicer, but am having a tough time deciding of course.  I found several great sites to search for lighting including http://www.rejuvenation.com/, http://www.barnlightelectric.com/, http://www.csnlighting.com/, and http://www.schoolhouseelectric.com/.  For some reason, I was really drawn to the sconces that were really meant for outdoors, but here are several that I'm considering...


So many decisions, so little time...


Thursday, September 9, 2010

Built-Ins... Almost

A cottage transformation wouldn't be complete without adding some built-ins.... not only because of the character they add, but also for the much-needed storage!  So, here is a sneak peak of the built-ins that were installed around the fireplace the other day....


Look at all the storage on each side!


On the left side, we have drop-down doors in place of the drawers in order to accomodate media components.  They both look the same when closed though...


As great as these cabinets are already, unfortunately there are a couple things that didn't turn out quite right... but that is to be expected when you are working with a house built in the '30's.  Afterall the floor is not level, the window is crooked, and the fireplace mantle is not centered!  I call that character or charm, but it is called a pain in the b-u-t-t if you are the guy making the built-ins, haha.

If you take a close look, the countertop is completely touching the fireplace on the right side, but on the left side there is a bit of a gap.  Well, that is due to the mantle not being centered....


Even closer up view of the left side...


And the right side...


See the difference?

So, after several nights of feeding Matt some beers and brainstorming, he came up with a brilliant idea.  We are going to notch out the hearth and then push the cabinets all the way up against the mantle on either side.  Of course, this will require changing the countertops to fit correctly, and adding a filler on the outside of each cabinet so that they are flush with the wall.

Baxter checked out the hearth and thinks it will work!


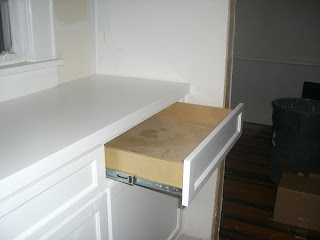
This idea also ended up solving the other small problem.  This drawer on the right side was too close to the wall which will soon have trim on it.  It opens fine now, but it would run into the trim and be blocked from opening if we left as is.  So, scooting everything over closer to the fireplace will give the drawer room to open after the trim is installed.


All the brainstorming also added a couple more ideas to the design of these...  Now we'll be adding some detail/trim around the top edge of the countertop and we're adding crown molding at the top of the mantle to finish it off and tie it in with the rest of the molding be installed. 

All of this re-work is most likely going to mean removing the cabinets all-together and taking them back to the shop, so it could take a little while, but will be worth the wait!

Oh yea, and I almost forgot the bookcase nook leading into the bedroom area...


I love how this little nook is turning out!

Ok, next step is to install all the trim work, so stay tuned for more updates soon....

Sunday, September 5, 2010

Flea Market Finds

One of my favorite shopping spots in Charlotte is the Metrolina Expo when the Antique Roadshow is in town.  It happens the first weekend of every month, so there are plenty of opportunities to find some treasures!  I like to try and go whenever I can, so I definitely jumped on the opportunity this Labor Day weekend to shop for my living/dining room re-do.  As I sit here on Sunday evening, I am the happiest girl ever because...

(1) I'm enjoying a fabulous glass of red wine from a bottle that Alvin purchased recently at Lake Norman Cottage (by the way, this is an awesome spot for wine and cottage decor, and they even offer wine tasting on a boat which I highly recommend).
(2) One of my top 10 movies is on TBS right now - The Holiday, which also happens to have some great houses that you can check out here at Hooked on Houses.
(3) I don't have to work tomorrow, woohooo!
(4) And of course, I found some amazing items at the Antique show this weekend! 

So, as I enjoy my wine and movie, I'll share my fun two-day antiquing binge.  First, here are a few things I liked as I was browsing through all the different booths...


Here is the one thing I really regret not getting.  It would look great hanging on a wall with a mirror behind it.  I'm definitely going to keep my eye open for something similar next month!


And now for the things I decided to purchase...

If you read my last post, you know about my current fabric frenzy.  Well, I fell in love with this fabric and just had to have it.  Let's hope I can figure out what to do with it :) 


How great is this pitcher with the navy blue stripes???


A perfectly shabby artichoke to add to my new collection...


I loved this old chippy-paint corbel.  The picture doesn't even do it justice, but it's got a pretty blue-gray color that will tie in wonderfully with my new color scheme.


That stool I've been using to prop everything up is a purchase as well.  It's also got a pretty shabby look, check out the sea blue color that shows up under the white paint.  I'm using it right now as a side table for my wine :)


I got a great deal on these botanicals, only $1 each!


And now for my most exciting find yet!  I have been looking for something like this for a while now.  Pretty much ever since I saw the dining room from HGTV's Sarah's House.  I love that show, she has the best taste.  Check out how she put vintage corbels in the opening of her dining room. 


So, I want to do the same thing in my new opening with these....


Aren't they great!!  It's soooo hard to find a matching set in this good condition, so I couldn't believe my luck when I found this pair in the right size and perfect style.  Here's a little more of close-up...


And finally, my last purchase is actually a gift for my most frequent reader and good friend, Susan.  I just couldn't resist purchasing them since they were a steal compared to any other oars I've seen.  And these have a nice light blue/turqoise color to them.  I think they'll look adorable in her lake house, even if she just leans them in a corner somewhere.  Hope you like them Susan :)