Sunday, November 15, 2009

Seasons in Plaza Midwood

I'm excited about a new art project I have in the works - "Seasons in Plaza Midwood". I had the idea last winter when we had a beautiful snow here. Before the snow started to melt, I took a bunch of pictures... The ones that turned out the best were from the end of the street with the quaint little Historic District sign is in the forefront. So, I thought - if it looks this great in the winter, why not take a similar pic for every season and frame it! So, almost a year later, I've finally gotten around to taking the fall pictures. I still need the spring and summer, but I think this is a good start. Check it out:


Wednesday, November 11, 2009

Spice Down My Kitchen

The kitchen in this house is exactly as you would expect from any 1930's cottage - small, cramped, and closed in. So, when we first moved in, the drab old cabinets and grandma wallpaper had to be spiced up big time. We wanted color to make it feel new, bright, fun - and to convince us to hang out in there long enough to cook! So, we went bold and painted the cabinets two tones of lime green, and an orange sherbert color for the walls. While it was definitely bold and spicy like we wanted, we got sick of it pretty quickly. So, 2 years later, we decided to try again.... This time, we wanted to spice it down :)

Here are a couple "in progress" pictures of Alvin and I working like crazy!


"Spicing down" our kitchen didn't mean we wanted it to be boring and drab again. We wanted a mix of classic, fresh, and modern. So by painting virtually everything including the countertops and floors and replacing all the hardware, I think we acheived what we were looking for!

The things I like the most are:
(1) The fake beadboard on the cabinet doors. Thanks to my good friend, Susan (her blog), for this awesome idea!!! It's just paintable wallpaper in a beadboard pattern that is actually raised so that it looks and feels almost like the real thing. It added so much character to the space!
(2) The backsplash really gave us that modern look. It was so easy and cheap, just plastic tiles that you cut to size and then glue on.
(3) The countertops were the toughest part, but made a huge difference. Who knew you could paint over laminate - another one of Susan's ideas, thanks Susan!! We painted them with a textured Ralph Lauren paint to look kind of like concrete. Then we put on a layer of resin (equal to 60 coats of polyurathane) which gave it the smooth, shiny look that makes a great working surface and is easy to clean.

And, the big reveal....


Monday, November 2, 2009

Screened Porch Makeover


If you've ever ventured down Central Ave past my neighborhood (Plaza Midwood), you know that it turns into a series of Chinese/Vietnamese/Mexican strip malls. It's not very pretty to look at, but Alvin and I have found that this area actually has a lot to offer for Charlotte cuisine. We've recently started to try out some of these places and have been pleasantly surprised with the food. What does this have to do with my screened porch makeover, you ask? Well, after trying a Vietnamese place called Bhen Thahn , which had some delicious pho soup and yummy coconut curry, I convinced Alvin to take a quick detour on the way home. So we stopped at one of my favorite spots - Restore. After all, it's the type of place where you never know what you will find. So if you are near by, its always good to stop and take a quick look.

It turned out to be a great choice because I found the white wicker set that I have been looking for all summer to complete my screened porch makeover! I have bought several other pieces this summer that help give this room a "cottagey" feel - (1) the 2 shabby white rocking chairs that I posted about earlier, (2) the chair that I "rehabbed" in my last post, (3) a small pine table that folds down on each side - another Restore find, (4) a white painted chair that I found at a nearby yard sale, (5) a black rattan trunk from the same yard sale, (6) a rug from FLOR which I originally intended for my bedroom, and (7) the Black and White sofa cushion which I found at the Midtown Marshall's.

The white wicker set had the shabby look I was going for with some nice vintage details that made it unique. After Alvin helped me with some rearranging to fit in all the pieces, it came together perfectly! One thing that I really love is the old glass door that we hung over the wicker sofa. It came from an old hutch that was left outside when we moved in. I'd like to paint it one day to make it look more like artwork. We strategically placed the plants to try and get as much privacy as possible, and I planted some creeping fig against the outside wall that I am hoping will crawl up the wall and eventually add a ton of privacy too.


I still have to finish the room with some pillows, curtains, and accessories - which is the most fun part - so I will post one final picture once it's complete. Alvin and I have already enjoyed this room by sitting out there with a bottle of wine on Halloween night as we waited for the tricker treaters. We also had some yummy pumpkin pancakes and hot coffee out there the next morning. Next we'll have to get some take out from our new favorite Vietnamese place and enjoy it on the porch :)

Saturday, September 12, 2009

Chair Rehab

It's been a while since I've actually completed any house projects, so I'm happy to report I finally got something done. And I'm excited because I think I found the easiest and most rewarding house project yet! This one is sure to make anyone feel like a fab designer and get the instant design satisfaction we all crave... It's Chair Rehab! Yep, I took an old chair that had good lines but was very dated, and I turned it into a modern cottage chair that will go great on my screened in porch! I found the chair at one of my favorite shops - Habitat for Humanity's Restore (http://www.charlotterestore.org/) on Wendover. After that, all it took was some spray paint, fabric, batting, a screwdriever, and a staple gun. I actually couldn't belive how simple it was. Covering the seat with new fabric was just like wrapping a present!

Before:


After:

Tuesday, August 25, 2009

Hydrangea Photos make their Debut

I found a couple simple white matted frames at Marshall's today, so I was able to put up my hyndrangea photos... check it out! The frames were only $5.99 each, and the photo's were less than $1 each, so it was a really inexpensive way to fill up a wall in my bathroom that has been completely empty forever.


Sunday, August 16, 2009

Mulch Anyone?

Ok, so I just wrote a short novel about my crazy week of landscaping which started out as an innocent trip to the Grower's Outlet in Pineville and practically turned into an entire episode of HGTV's Curb Appeal! Luckily for any readers out there, I somehow didn't save that long post correctly and lost the entire thing. Probably better since all anyone wants to see is the pictures anyway!

So, I don't have anything for before pics but just imagine tons and tons of weeds! And after lots of digging, planting, and muching on some very hot days... Thankfully my fabulous and very patient boyfriend came in as my reinforcement to help me finish it up this weekend (Thanks Alvin!). Here is the finished product!


Since that picture just doesn't do it justice, here is a closer shot of the Limelight Hydrangea, Knock-Out Roses, and Echinacea...


Even closer of the largest hydrangea, which I actually had to rig up with some twine to keep it from falling over because the flowers were weighing it down on one side. Hopefully this trick will help get it settled and then I can let it go wild once the roots take hold...


Here is a shot of the butterfly bush, which has actually been attracting lots of pretty butterflies - this should grow to be fairly big, i think as tall as 5 feet!


Here is a close up of the knock-out roses, which are supposed to be very low maintenance. I'm hoping they will start flowering a lot more once they get settled in their new spot...


And finally, the echinacea which should come back every year and rosemary which should turn into a nice size bush that I can actually use for cooking (if I ever cooked, haha)...


Also of note, we moved 4 of the blue hydrangeas from the back because they were struggling and I figured I might as well try putting them in a shadier spot to see if I can save them. So, 2 of them ended up in the front, but kind of hidden so that hopefully you won't notice them until they come back to life. And 2 of them ended up on the side of the house to fill out an area that was pretty blah. We also moved a bunch of the grassy border plants that we dug up from in between the weeds in the front to line the mulch areas in the backyard. And finally, we filled the spots where the blue hydrangeas used to be with some evergreen camelias which bloom in the winter. I can't wait for everything to start filling in and to see how things change over the seasons!

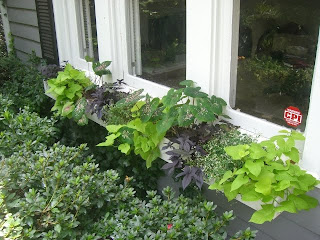
Oh, and last thing... I spruced up the flower box in the front of the house a couple weeks ago and it's filling out nicely. I am hoping this lasts through the fall...
Thursday, August 13, 2009

Desperate for Art

My house is in desperate need of some artwork to add some interest and color. But I have such a hard time finding anything in the store that I like, and it's just so expensive! So, instead, I have decided to become my own photographer. I am not sure how the picture quality will turn out in print yet, but I figured it's worth a try. So far, I have just taken a couple photos of things around the house which I've posted here. I think the hydrangeas will look nice in little white antique frames in my bathroom. I also plan on going around the neighborhood to get some pics - like unique front doors, or front-porch swings, or maybe just cool bungalows. I figure if I keep it simple and group similar things into a photo collage, it could work. So, yet another project is in the works, but this one will be really fun!


Sunday, August 9, 2009

Shabby Chic Rockers!


Woohoo! I'm so excited, just found two great shabby chic rocking chairs at the neighborhood antique store for a great deal. They look adorable on my screened in porch which I am trying to re-decorate at the moment. I also found an old stool in my neigbhor's trash the other day which works great as a side table in between the rockers... don't worry it wasn't in the actual trash can, just on the side of the road :) Anyway, I have to get back to finishing my kitchen and landscaping projects that I started this weekend (more about those later...), but couldn't wait to post this pic of my new shabby chic rockers! How did Baxter stick his head in this pic, he loves the camera, too funny!


Saturday, August 8, 2009

Just another Friday night


Well, I just spent another Friday night trying to fix up my house. Finally finished touching up the kitchen cabinets and putting on the new hardware. I think its looking pretty good, but I definitely need to work on my cabinet painting technique, haha. Actually, I hope I never have to paint cabinets again!

After wrapping up for the night, I checked out a few blogs like http://www.theletteredcottage.net/ for some design inspiration. Then I thought, why not start a blog for myself! I may not be a fabulous designer, but it would definitely be fun to track and share all the projects I have attempted in my little "cottage" in Charlotte :)

So, pictures and more stories to come! For now, it's time to get some rest so I can get up early to start working on the kitchen countertops...